 Restorative Yoga is one of the most nurturing and healing practices.
In my Monday morning Kamloops yoga class, I teach a blend of active asana (focusing on hip openers) and restorative yoga, creating a meditative state and environment in which the body can go into deep healing and return to your natural pulsation.
If you don’t live in Kamloops or aren’t able to come to my class, this article can help you discover the bliss of Restorative Yoga.
I’ve included a Restorative Yoga Practice for you at the end of this article. This is a great way to get in some nurturing and healing time with yourself. You can do all or part of this practice, so it is adaptable as time allows. Even just one of these poses can be incredibly helpful.
Feel free to print it out and take it to your mat!
Some of the benefits of Restorative Yoga include:
- It’s a superb way to de-stress
- It allows you to rest while still creating space in your body
- Increases circulation and respiratory capacity
- Gently opens key areas of the body, especially the chest and shoulders
- Helps you come into a meditative state and calms your mind
- Calms the nervous system
- Balances hormones and emotions
- Boosts the immune system
- Helps you detoxify
- And much more!
How Do You Do Restorative Yoga?
 You can include Restorative Yoga in your regular asana practice as a sweet bonus at the end, or do an entire practice of restorative poses. Restorative Yoga is especially nice in the evening as a way to unwind and help yourself get a good night’s sleep.
Stay present during your practice, focusing on your breath and healing thoughts.
It’s important to remember that, even though it might not seem like you’re doing much when you’re in the poses, you are communicating with your body, mind, and heart the whole time. You’re also detoxifying your body, so be sure to stay hydrated throughout the day and after your practice.
This approach to asana practice is especially appropriate if you are feeling run-down, stressed out, fatigued, or dealing with emotional trauma such as grief or sadness.
This is an excellent way to release stuck emotions, especially in the chest openers. Why? Because when you do a restorative chest opener, you’re completely supported.
Allowing the heart to be exposed can often feel vulnerable, but in restorative postures you feel safe, knowing that you can let go of anything that you don’t need any more because you are quite literally completely supported. This helps to lift depression and release anything that doesn’t serve you – just have that gentle release as your intention and breathe it into being.
One of the great things about the supported chest openers in Restorative Yoga is that they counter the slouching position we often find ourselves in.
By gently stretching the muscles in the fronts of the shoulders and opening the chest, a great deal of freedom is created in the breath, circulation, and the heart chakra. (If you want to learn more about the chakras, visit my Yoga Chakra Healing page.)
A Restorative Yoga Practice
This practice is designed to create well being and a sense of freedom.
As with anything, it is your responsibility to discern if this practice is right for you or not.
NOTE: If you don’t have bolsters available to you, just gather pillows and blankets and make the same shapes for your body. Please know that bolsters are firm, so you may have to pile up quite a few pillows to get the same effect.
Also, cover up with a blanket to keep warm if you are even a little bit cool. You might like to play some soothing music.
*** At all times in these poses you should be comfortable, so make whatever adjustments necessary so that your body says “Oh yeah, this is delicious!” ***
Centering In
 FIRST: Take a few minutes to center in. Turn to your breath and just feel it move. Notice your hips on the earth. Feel your body, just taking note of where you are at the beginning of your practice.
Spend a minute or two setting your intention for your practice, whether that is to heal something specific, to help you sleep, or to connect with your heart.
Open with 3 Om’s, and include any mantra that helps you connect with your heart. You may want to use the Anusara yoga Invocation, or something as simple as Om Shanti (Shanti means ‘peace’ and brings you into that vibration).
REMEMBER to stay present with your breath and your intention as you do these poses. This should be a sweet, nurturing practice in every way.
You may also want to consider doing a bit of active asana to warm up. Sun salutations, hip openers, or anything else your body asks for are a great way to prepare for Restorative Yoga. However, this isn’t necessary, and you can go straight into the practice below.
Supta Baddha Konasana (3-5 minutes)
SET-UP: Sit right up against your bolster (or pillows) before you lean back. Be sure to bring the blankets under your thighs right up next to your hips. Touch the soles of your feet together. You can also support your forearms if it’s too much opening in the chest or shoulders. There should be no tension in your neck or back.

You might also like to have a little stretch with your arms above your head, as shown above. This will help to open your breath. Hold only as long as it feels good.
![]()
TRANSITION: Before coming out of the pose, stretch your legs out and rest there for a minute. Then, to come out, bend your knees, taking your feet to the floor, and roll to the side with awareness and stability through your hips, using your hands to support you.
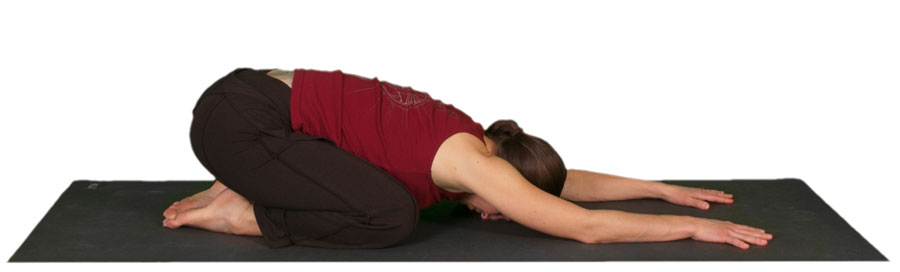
Supported Child’s Pose (3-7 minutes)
This is one of the sweetest poses. It helps you feel calm as your belly and heart are supported.
 SET-UP: Take the bolster (and other props if you need more height to support your belly) near your hips, but you are not sitting on it. Toes touch, knees are wide. If your knees feel too much pressure from this, you may take a blanket under you to cushion, or roll a blanket behind the knees in between your calves and thighs to create more space.
Half way through your pose, turn your head gently to the other side.
TRANSITION: Take a few breaths to first introduce the idea of moving before you come out of the pose. Use your arms to push down, and your inhale to lift you up.
Supported Chest Opener (2-5 minutes)
NOTE: If you want a shorter practice, you can skip down to the twist.
 SET-UP: Make sure your lower back is happy. You can put more blankets under your hips if necessary. Having something under your knees will create more space in your lower back. If you’re still finding discomfort, extend your tail bone toward your heels. As with the first pose, you may place blankets or pillows under your arms if it is too much of a stretch for your chest or shoulders.

TRANSITION: Move into the position shown above by rolling to the side and pushing all but the support under your knees out of the way. Spend a minute or two here before going on.
Supported Child’s Pose (2-5 minutes)
It’s so good you get to do it again! Enjoy your time in this incredibly nurturing position. Surrender your weight to the support beneath you and breathe.
Restorative Twist (30 seconds to 1 minute upright, 1-3 minutes on bolster. Repeat on the other side.)
NOTE: With twists it is important to remember that you always create space in the spine before twisting.
SET-UP: Start in an upright position with your hips steady on the earth. Sit on your right hip with your knees to the front and your feet to the left. INHALE to lift up through your lower back and heart, getting taller up through your spine and the crown of your head, then EXHALE to twist.

Breathe in this seated twist for 30 seconds to 1 minute, then come forward over your bolster with an exhale. Adjust your hips if you need to. You can turn your head to the left or right, depending on what your neck prefers.

TRANSITION: When you are ready to come up, INHALE up and untwist, creating more space in your spine by rising tall as you do so. Use your arms to help you lift up. Then take your body through neutral, switch your bolster to the left and repeat on the other side.
 Note: I’ve shown the head looking behind in the first photo, and the head looking forward in this one above. If you look back it includes the cervical spine in the twist more fully, but only do this if it is not forced or strained.
Viparita Kanari or Supported Shoulder Stand (5-10 minutes)
NOTE: If you have high blood pressure, please skip this pose or consult your health practitioner first. Ladies, if you are on your cycle, skip this inversion and either do the first pose, Supta Baddha Konasana, or Supported Child’s Pose again. Going upside down when menstruating goes against the downward flow your body needs during this time of connecting to your divine feminine nature. Restorative yoga is wonderful during your cycle, as it allows you to rest and nurture yourself.

IMPORTANT: Make sure you keep a natural curve in your neck. This can be done by lifting your chest with an inhale and sliding your shoulders more toward each other so your chest is more open. Do not let your chin rest on your chest, instead, press gently back through your ears so the front of your throat has space.
SET-UP: Put one or two bolsters about 4 inches away from the wall. For Legs Up The Wall pose (Viparita Kanari), simply use one bolster with no blanket under you.
You can also do this pose with no props, just lying on your back with your legs up the wall.
If you want to do Supported Shoulder Stand as shown, you will need a higher support for your hips and will want to put a blanket under your shoulders, NOT your head. This is to keep the natural curve of your neck. There should be no vertebrae on the floor, instead you are supported by your shoulders and press gently back from the tops of your ears.
To get into the pose, I recommend sitting sideways on the edge of the bolster, reach your arms behind you to your mat, push into your arms to support yourself as you swing your legs up the wall, and then slowly lower down. This pose can be awkward to get into, so do what you need to in order to get there, even if that is by starting on the ground with your hips somewhat near the wall, and pulling the bolster under your hips from there.
You do NOT have to have your hips touching the wall, in fact, it is more comfortable if there is some space between you and the wall. Make sure your lower back and hips feel well supported. Your arms can rest out or you may put your hands on your belly, whatever is most comfortable for you. Enjoy your breath and stay present with your intention.
TRANSITION: When you are ready to come out, slide (or wiggle) back till your hips are on your mat and rest your legs on your bolsters for a minute or two before rolling to the side. Move slowly, giving yourself a few breaths on your side, then move into Savasana.
Savasana (5-10 minutes or longer)

SET-UP: Arrange your body in a comfortable position and cover up with a blanket or otherwise make sure you’re warm. Once you have found a place where you feel even (symmetrical) and comfortable, be still other than the waves of your breath.
Take your time resting and relaxing after your practice. This is a very important pose in order to integrate the benefits of your practice. And it is especially crucial to include Savasana after the inversion above, as this allows the re-oxygenated blood and nutrient rich fluids of your body to distribute themselves evenly as you lie with your body all on one level.
Savasana is a wonderful opportunity to surrender all struggle and be at peace. Take a deep breath and let yourself be held by the Earth beneath you. Give your breath full freedom, and ride the waves of beauty that each inhale and exhale bring.
TRANSITION: Come out of Savasana slowly, first creating more space for your breath to deepen, then inviting movement back to your fingers and toes, and finally stretching your arms away from your feet and rolling to your right side. Give yourself a few breaths on your side before using your arms and your inhale to lift yourself up.
Spend a minute or longer in seated to savor the practice and finish with an Om and an inward blessing.
Comments and Love
Did you enjoy this practice, or do you have anything to add?
If so, please leave a comment below to contribute to the rich value I endeavour to offer here. Your opinion and thoughts are welcomed.
Also, please spread the love by clicking the “Like” button below so your Facebook friends can enjoy this as well!
(Photos by Natalie Anfield – Kamloops Photographer Extraordinaire!)
aaaaaahhhhhhhh thanks 🙂
You’re very welcome! 🙂
I am wanting to come on Monday (14th)- I just wanted to double check that I don’t need to pre-register.
Monica – No need to preregister. 🙂
See you in class. – Katrina
Katrina, I’ve just had a total knee replacement and am wondering can you tailor a program for me. I’ve also had two back surgeries for blown discs.I want to stay as active as possible. Thanks Rick
Rick,
I’d be happy to help you find a practice that works for your situation and helps your body stay strong and heal. The best approach for this would be a private Yoga Therapy session. I’ll email you directly to let you know about them.